 摘要:
摘要: 今天开始CSS的构造模型,今天的课程推荐大家先看看第四章 CSS 边框border与边界padding和margin和第五章 CSS 区块、浮动、定位、溢出、滚动条,看过这2章后可以更好的理解下面内容,大家可以把下面代码复制带页面
今天开始CSS的构造模型,今天的课程推荐大家先看看第四章 CSS 边框border与边界padding和margin和第五章 CSS 区块、浮动、定位、溢出、滚动条,看过这2章后可以更好的理解下面内容,大家可以把下面代码复制带页面中查看效果。
") 一、div
一、div
部分(division)---<div>元素,经常以div 形式引用,是XHTML 元素,用于定义XHTML 文件中的区域。
1、添加div
<div>
<p>This is our content area.</p>
</div>
给div 添加一个id
<div id=”container”>
<p>This is our content area.</p>
</div>
#container {
Padding: 20px;
Border:1px solid #000;
Background:#ccc;
}
2、添加子div
<div id=”container”>
<p>This is our content area.</p>
<div class=”box”>
<p>I’m in a box!</p>
</div>
<div class=”box”>
<p>I’m also in a box!</p>
</div>
</div>
.box {
margin: 10px;
padding: 20px;
border: 1px solid #000;
}
3、div 和上下文选择器
.box p {Color: #333;}
#container p {Color: #333;}
二、边距
1、外边距(margin)
外边距声明:
#container {
Margin:-top: 20px;
Margin-left: auto;
Margin-right: auto;
Margin-bottom; 20px;
Width: 300px;
Border: 1px solid #333;
Padding: #ccc;
}
#container {
Margin: 20px auto 1em auto; /*上,右,下,左*/
}
用margin:auto 居中
Body {Text-align: center;}
#container {
Width: 400px;
Margin: 10px auto 10px auto;
Padding: 20px;
Background: #ccc;
Text-align: left;
}
2、内边距(padding)
#container {
Padding-top: 20px;
Padding-left: 10%;
Padding-right: 1em;
Padding-bottom: 0;
Background: #ccc;
}
3、外边距,内边距和主体
Body {
Margin: 0;
Padding: 0;
}
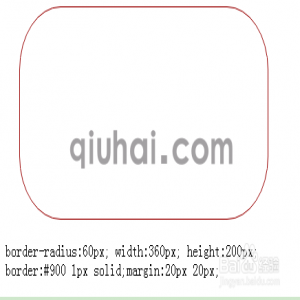
三、边框
Border-style (边框样式):None(无边框)、dotted(点线)、dashed(虚线)、Solid(实线)、double(双线)、groove(凹槽)、ridge(凸槽)、Inset(凹边)、outset(凸边)
/*上右下左*/
Border-style: solid dotted inset outset;
Border-width(长度)
Border-top-width
Border-right-width
Border-bottom-width
Borer-left-width
Border-color
Border
Border-top
Border-right
Border-bottom
Border-left
Border(四周)Border-top(上)…
四、定位
P,h1 和div 等成为块级元素。意思是这些元素显示为一块内容,即”块框”。与之相反,strong 和span 等元素称为行内元素,即”行内框”。
1、相对定位
#myBox {
Position: relative;
Top: 20px;
Left: 20px;
}
2、绝对定位
#myBox {
Position:absolute;
Top: 20px;
Left: 20px;
}
五、浮动
.news img {
Float: left;
}
.news p {
Float: right;
}
更多请查看:15天学习DIV+CSS教程


发表评论
加载中~